HOW TO FIT & USE PLANER BLADES SAFELY
Setting Up
We offer a full range of replacement blades to fit the majority of planers on the market. Some models from Makita, Ryobi and Hitachi have a dual blade system to allow a thicker resharpenable blade to be used and may need the Trend PB/CK/119 conversion kit to fit with Trend disposable blades.
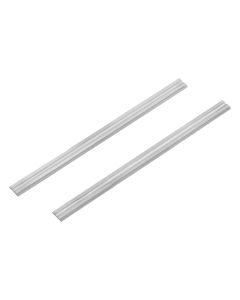
Select the correct set of blades for your planer. You can check the correct blades by checking our compatbility guide or by using the reference chart in the Trend catalogue. The Trend blades are solid carbide and are reversible with two usable edges and they are available in Craft Pro and Professional options.

Fitting
Before commencing any work on your machine, ensure it is unplugged to prevent any accidents. Different manufacturers use different securing methods for their blades but in general there are two main options.

Blades are secured by either clamping plates that bolt down on top of the block and clamp down on the blades to secure them...

Or with blade holders that sit into housings in the block with jacking screws or bolts that apply wedging pressure to the holders to secure the blades.

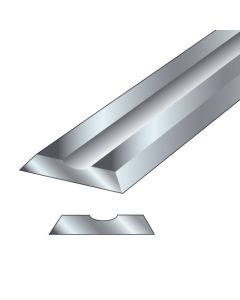
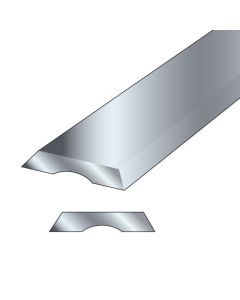
Both blade securing methods will have raised ridges that align into the grooves on the back of the Trend planer blades to automatically set the correct projection making set up very quick and easy.

Before fitting new blades it is essential that any build-up of resin and dust is cleaned away from the clamps so that the blades sit correctly.

Trend Tool and Bit Cleaner CLEAN/500 will loosen and remove any build-up of resin, dirt and stubborn deposits.

Spray on and leave to penetrate.

Once loosened it can be cleaned away using the brass wire brush from the Trend Collet Brush Kit CB/KIT.

Repeat the process on the block to remove any build-up of resin or dust.

Wipe away any resin, dust and excess fluid with a soft cloth.

Once the block and blade holders are clean the blades are set into place. Slide into position by aligning the groove on the blade with the holder ridges and slide in until central.

Some planers are designed to rebate as well as plane a surface so the blades need to be set correctly to the open end of the block. Using a straight edge along the edge of the plane sole, move the cutter along until it sits in line with this and nip up the holder to secure it.
Rotate the block to the second position and repeat the procedure. It is good practice to project one or both of the blades fractionally beyond the edge of the sole.
Safe Working Practice

Power planers are very versatile tools for quickly removing large amounts of materials as well as finer fitting but it is important to ensure the blades are always sharp.
Trying to work with a blunt or damaged edge not only overworks the tool motor and lessens performance it can also lead to accidents.

This would be disastrous if attempted on a power plane with a spinning cutter block as the fingers are very likely to come into contact.
Although a power planer can be operated single handed, wherever possible keep both hands on the tool using the hoop handle and front knob to guide and use it safely, or keep your free hand well away from the cutter area if operating single handed.
Before plugging in and commencing work check to see that the dust ejection port is clear of debris so that the waste ejects freely either into the collection bag or by extraction as a blocked port will allow shavings to quickly build up around the cutter block. This will affect performance as well as leading to inaccurate cutting per pass and a poor finish.

If the planer has a parking shoe, ensure this operates freely.

Its purpose is to prevent cutter damage when placed on a flat hard surface, the workpiece or the bench but take care when moving the planer away from the workpiece if the block is still spinning as the blades are fully exposed.

A planer performs better if it is used in the same way as a router, so wherever possible set the depth of cut to take a number of smaller passes to remove waste rather than one big cut. A final skimming cut will leave the cleanest finish.

If your planer comes with a side fence, use it when planing an edge such as a door to aid stability and keep the planer from tipping as it runs along the edge.
If you encounter a piece of debris that puts a small nick in the blades which leaves tram lines on the final finish you can get over it by nudging one blade over slightly to counteract the nicked blade.
Take care in doing so to ensure the blade doesn't foul on the casing of the planer body by rotating the block freehand with it unplugged.